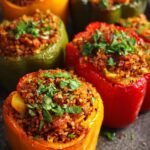
Introduction to Stuffed Bell Peppers
As a busy mom, I know how challenging it can be to whip up a meal that pleases everyone. That’s where my love for stuffed bell peppers comes in! These vibrant, colorful beauties are not just a feast for the eyes; they’re a quick solution for a hectic day. With a savory filling of rice, meat, and spices, they’re sure to impress your loved ones. Plus, they’re easy to customize, making them perfect for picky eaters. Let’s dive into this delicious recipe that will have your family asking for seconds!
Why You’ll Love This Stuffed Bell Peppers
Stuffed bell peppers are a lifesaver for busy weeknights. They come together quickly, making dinner prep a breeze. The best part? They’re packed with flavor and nutrition, so you can feel good about serving them. Plus, they’re versatile! You can easily swap ingredients based on what you have on hand. Trust me, once you try this recipe, it’ll become a staple in your home!
Ingredients for Stuffed Bell Peppers
Gathering the right ingredients is key to making delicious stuffed bell peppers. Here’s what you’ll need:
- Large bell peppers: Choose vibrant colors like red, yellow, or green. They add a pop of color and sweetness.
- Cooked rice: This serves as the base of your filling. You can use white, brown, or even quinoa for a healthier twist.
- Ground beef or turkey: This adds protein and heartiness. Feel free to substitute with plant-based meat for a vegetarian option.
- Diced tomatoes: A can of these brings moisture and flavor. You can also use fresh tomatoes if you have them on hand.
- Onion: Chopped onion adds a savory depth to the filling. Yellow or white onions work best.
- Garlic: Minced garlic gives a fragrant kick. Fresh is best, but jarred garlic can save time.
- Italian seasoning: This blend of herbs enhances the flavor profile. You can also use your favorite herbs like basil or oregano.
- Salt and pepper: Essential for seasoning. Adjust to your taste for the perfect balance.
- Shredded cheese (optional): Cheese on top adds a delicious, melty finish. Try mozzarella, cheddar, or a dairy-free alternative.
For exact measurements, check the bottom of the article where you can find everything available for printing. Happy cooking!
How to Make Stuffed Bell Peppers
Making stuffed bell peppers is a delightful journey that fills your kitchen with mouthwatering aromas. Follow these simple steps, and you’ll have a delicious meal ready in no time!
Step 1: Preheat the Oven
First things first, preheat your oven to 375°F (190°C). Preheating is crucial because it ensures even cooking. You want those peppers to roast perfectly, not just sit in a lukewarm oven!
Step 2: Prepare the Bell Peppers
Next, grab your bell peppers. Cut the tops off and remove the seeds. I like to use a small knife to carefully carve out the insides. This way, you create a cozy little pocket for the filling. Rinse them under cold water to remove any leftover seeds.
Step 3: Cook the Aromatics
In a skillet, heat a splash of olive oil over medium heat. Add the chopped onion and minced garlic. Sauté them until they’re softened and fragrant, about 3-4 minutes. This step builds a flavor foundation that makes your stuffed bell peppers irresistible!
Step 4: Brown the Meat
Now, it’s time to add the ground beef or turkey to the skillet. Cook it until it’s browned and no longer pink. Make sure to break it up with a spatula as it cooks. This adds texture and flavor to your filling. Don’t forget to season it with a pinch of salt and pepper!
Step 5: Mix the Filling
Once the meat is cooked, stir in the cooked rice, diced tomatoes, and Italian seasoning. Mix everything well until combined. This filling is where the magic happens! It’s hearty, flavorful, and oh-so-satisfying.
Step 6: Stuff the Peppers
Now comes the fun part—stuffing the peppers! Use a spoon to fill each pepper with the mixture. Don’t overstuff them; leave a little room at the top for the filling to expand while baking. This will help keep everything intact and delicious!
Step 7: Bake the Stuffed Peppers
Place the stuffed peppers in a baking dish and cover them with foil. This helps them steam and cook evenly. Bake for 30 minutes. The peppers should be tender and the filling heated through. The aroma will be heavenly!
Step 8: Add Cheese and Finish Baking
After 30 minutes, remove the foil and sprinkle shredded cheese on top if you’re using it. Return the peppers to the oven for an additional 10-15 minutes. This will melt the cheese and give your stuffed bell peppers a beautiful golden finish. Trust me, it’s worth the wait!
Tips for Success
- Use a mix of colors for your bell peppers to make the dish visually appealing.
- Don’t skip the preheating step; it’s key for even cooking.
- Feel free to add veggies like zucchini or mushrooms to the filling for extra nutrition.
- For a spicier kick, add some crushed red pepper flakes to the mixture.
- Let the stuffed peppers rest for a few minutes before serving; this helps the flavors meld.
Equipment Needed
- Baking dish: A glass or ceramic dish works well. You can also use a metal pan if that’s what you have.
- Skillet: A non-stick skillet is great for cooking the filling. Any frying pan will do!
- Knife: A sharp knife is essential for cutting the peppers.
- Spoon: Use a large spoon for stuffing the peppers.
- Foil: Aluminum foil helps keep the peppers moist while baking.
Variations of Stuffed Bell Peppers
- Vegetarian Delight: Swap the meat for black beans or lentils. Add corn and diced bell peppers for a colorful, plant-based filling.
- Mexican Twist: Use taco seasoning instead of Italian. Fill with cooked rice, black beans, corn, and top with salsa and avocado.
- Quinoa Power: Replace rice with cooked quinoa for a protein-packed option. Mix in chopped spinach and feta cheese for extra flavor.
- Italian Style: Incorporate Italian sausage and add marinara sauce to the filling. Top with mozzarella cheese for a cheesy finish.
- Breakfast Peppers: Stuff with scrambled eggs, cheese, and diced veggies for a fun breakfast twist. Perfect for brunch!
Serving Suggestions for Stuffed Bell Peppers
- Side Salad: Pair with a fresh garden salad for a light, crunchy contrast.
- Garlic Bread: Serve with warm garlic bread to soak up any delicious juices.
- Wine Pairing: A glass of red wine complements the flavors beautifully.
- Presentation: Garnish with fresh herbs like parsley or basil for a pop of color.
- Yogurt Dip: A dollop of Greek yogurt adds creaminess and balances the spices.
FAQs about Stuffed Bell Peppers
Can I make stuffed bell peppers ahead of time?
Absolutely! You can prepare the filling and stuff the peppers a day in advance. Just cover them and store them in the fridge. When you’re ready to bake, pop them in the oven straight from the fridge. This makes dinner even easier on busy nights!
What can I use instead of rice in stuffed bell peppers?
If you’re looking for alternatives, quinoa, couscous, or even cauliflower rice work wonderfully. Each option brings a unique flavor and texture, so feel free to experiment based on your family’s preferences!
How do I store leftover stuffed bell peppers?
Leftover stuffed bell peppers can be stored in an airtight container in the refrigerator for up to three days. You can also freeze them for later use. Just make sure to wrap them well to prevent freezer burn!
Can I use different types of meat?
Yes! Ground turkey, chicken, or even plant-based meat alternatives are great substitutes. Each option will give your stuffed bell peppers a different flavor profile, so choose what suits your taste best!
How do I know when the stuffed peppers are done?
Your stuffed bell peppers are done when the peppers are tender and the filling is heated through. If you’ve added cheese, it should be melted and bubbly. A fork should easily pierce the peppers, indicating they’re ready to enjoy!
Final Thoughts
Stuffed bell peppers are more than just a meal; they’re a canvas for creativity and a way to bring the family together. Each bite is a burst of flavor, and the vibrant colors make the dish a feast for the eyes. I love how this recipe allows for endless variations, catering to everyone’s tastes. Whether you’re a busy mom or a professional, these stuffed bell peppers are a delightful solution for any night of the week. So, roll up your sleeves, gather your loved ones, and enjoy the joy of cooking and sharing this delicious dish together!
PrintStuffed bell peppers: Try this easy, delicious recipe!
A simple and delicious recipe for stuffed bell peppers filled with a savory mixture of rice, meat, and spices.
- Prep Time: 15 minutes
- Cook Time: 45 minutes
- Total Time: 1 hour
- Yield: 4 servings 1x
- Category: Main Dish
- Method: Baking
- Cuisine: American
- Diet: Gluten Free
Ingredients
- 4 large bell peppers
- 1 cup cooked rice
- 1 pound ground beef or turkey
- 1 can diced tomatoes (14.5 oz)
- 1 onion, chopped
- 2 cloves garlic, minced
- 1 teaspoon Italian seasoning
- Salt and pepper to taste
- 1 cup shredded cheese (optional)
Instructions
- Preheat the oven to 375°F (190°C).
- Cut the tops off the bell peppers and remove the seeds.
- In a skillet, cook the onion and garlic until softened.
- Add the ground meat and cook until browned.
- Stir in the cooked rice, diced tomatoes, Italian seasoning, salt, and pepper.
- Stuff the mixture into the bell peppers.
- Place the stuffed peppers in a baking dish and cover with foil.
- Bake for 30 minutes, then remove the foil and sprinkle cheese on top if desired.
- Bake for an additional 10-15 minutes until the peppers are tender and the cheese is melted.
Notes
- Feel free to customize the filling with your favorite ingredients.
- Leftover stuffed peppers can be stored in the refrigerator for up to 3 days.
- These can also be frozen for later use.
Nutrition
- Serving Size: 1 stuffed pepper
- Calories: 350
- Sugar: 5g
- Sodium: 600mg
- Fat: 15g
- Saturated Fat: 6g
- Unsaturated Fat: 8g
- Trans Fat: 0g
- Carbohydrates: 30g
- Fiber: 3g
- Protein: 25g
- Cholesterol: 70mg