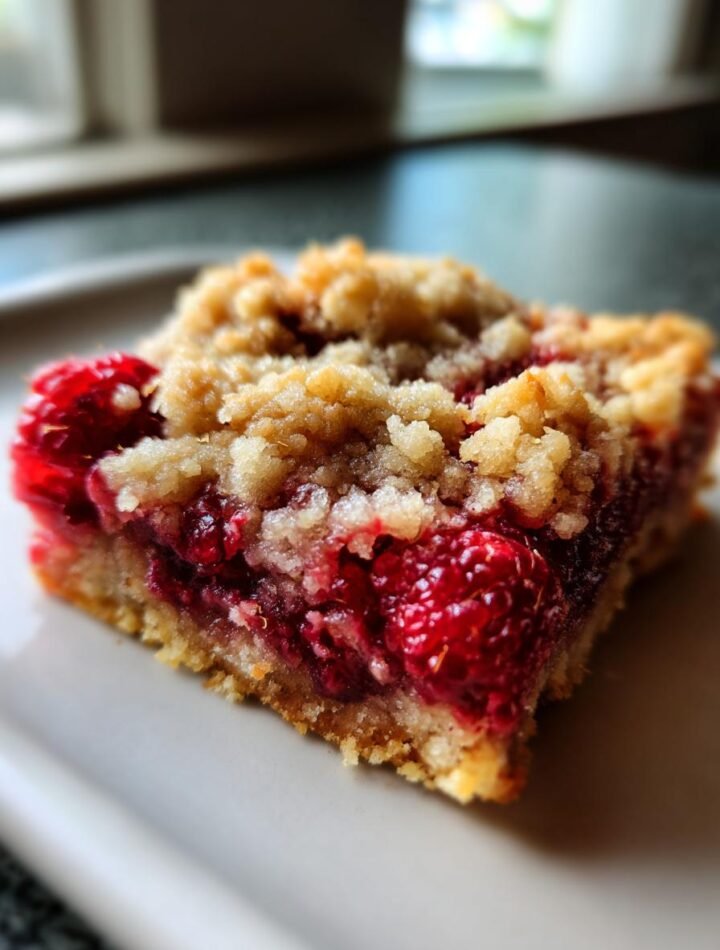
Introduction to Gluten Free Raspberry Crumble Bars
As a busy mom, I know how challenging it can be to whip up something delicious and healthy. That’s why I absolutely adore these gluten free raspberry crumble bars! They’re not just a treat; they’re a quick solution for those hectic days when you need a sweet pick-me-up. With their vibrant raspberry filling and crumbly oat topping, these bars are perfect for impressing your loved ones or simply enjoying with a cup of tea. Trust me, once you try them, you’ll want to keep this recipe close at hand for all your dessert cravings!
Why You’ll Love This Gluten Free Raspberry Crumble Bars
These gluten free raspberry crumble bars are a delightful blend of ease and flavor. They come together in just 45 minutes, making them perfect for busy days. The sweet-tart raspberries burst with flavor, while the crumbly topping adds a satisfying crunch. Plus, they’re gluten-free, so everyone can enjoy them without worry. Whether for a snack or dessert, these bars are sure to become a family favorite!
Ingredients for Gluten Free Raspberry Crumble Bars
Gathering the right ingredients is the first step to creating these delightful gluten free raspberry crumble bars. Here’s what you’ll need:
- Gluten-free oats: These provide the base for the crumble and add a hearty texture. Make sure they’re certified gluten-free to avoid cross-contamination.
- Almond flour: This adds a nutty flavor and helps bind the bars together. If you’re nut-free, you can substitute with sunflower seed flour.
- Coconut oil: Melted coconut oil gives the bars a rich, buttery taste without the dairy. You can also use unsalted butter if you prefer.
- Honey or maple syrup: Both sweeteners add natural sweetness. Honey gives a floral note, while maple syrup offers a deeper flavor. Choose based on your preference!
- Vanilla extract: A splash of vanilla enhances the overall flavor, making these bars even more irresistible.
- Salt: Just a pinch balances the sweetness and brings out the flavors of the other ingredients.
- Fresh raspberries: The star of the show! Their tartness pairs beautifully with the sweet crumble. Feel free to swap in blueberries or strawberries if you’re in the mood for a change.
- Cornstarch: Tossing the raspberries with cornstarch helps thicken the filling, preventing it from becoming too runny.
For exact measurements, check the bottom of the article where you can find everything listed for easy printing. Happy baking!
How to Make Gluten Free Raspberry Crumble Bars
Now that you have all your ingredients ready, let’s dive into the fun part—making these scrumptious gluten free raspberry crumble bars! Follow these simple steps, and you’ll have a delightful treat in no time.
Step 1: Preheat the Oven
First things first, preheat your oven to 350°F (175°C). This step is crucial because it ensures even baking. While the oven warms up, line an 8×8 inch baking dish with parchment paper. This makes it easy to lift the bars out later and keeps cleanup a breeze!
Step 2: Prepare the Crust Mixture
In a large bowl, combine the gluten-free oats, almond flour, melted coconut oil, honey or maple syrup, vanilla extract, and salt. Mix everything together until it forms a crumbly texture. You want it to hold together when pressed but still be a bit loose. This mixture will be the base and topping for your bars!
Step 3: Form the Crust
Take half of the crust mixture and press it firmly into the bottom of your prepared baking dish. Use your fingers or the back of a measuring cup to create an even layer. Make sure it’s packed tightly; this will help it hold together when baked. It should feel sturdy and ready to support the juicy raspberry filling!
Step 4: Prepare the Raspberry Filling
In another bowl, toss the fresh raspberries with cornstarch. This helps absorb some of the moisture and keeps the filling from getting too runny. Once coated, spread the raspberries evenly over the crust. Their vibrant color will make your bars look irresistible!
Step 5: Add the Topping
Now, sprinkle the remaining oat mixture over the raspberries. Make sure to cover them evenly, allowing some of the berries to peek through. This topping will create that delightful crumble texture we all love. It’s like a cozy blanket for the raspberries!
Step 6: Bake the Bars
Pop the baking dish into the preheated oven and bake for 25-30 minutes. Keep an eye on them! You’ll know they’re done when the top is golden brown and the raspberries are bubbling slightly. The aroma will fill your kitchen, making it hard to resist sneaking a taste!
Step 7: Cool and Cut
Once baked, remove the dish from the oven and let it cool completely. This step is essential! If you cut them too soon, they might fall apart. Once cooled, lift the bars out using the parchment paper and cut them into squares. Enjoy your delicious gluten free raspberry crumble bars!
Tips for Success
- Use fresh raspberries for the best flavor; frozen can work, but may make the filling watery.
- Don’t skip the cornstarch; it’s key to keeping the filling thick and delicious.
- Let the bars cool completely before cutting to ensure clean edges.
- For a fun twist, add a sprinkle of cinnamon to the crust mixture.
- Store leftovers in an airtight container to keep them fresh and tasty!
Equipment Needed
- 8×8 inch baking dish: A square dish is perfect, but you can use a similar-sized round dish if that’s what you have.
- Parchment paper: This makes for easy removal. If you don’t have any, grease the dish well with coconut oil.
- Mixing bowls: Use any size you have on hand; just make sure they’re large enough for mixing.
- Measuring cups and spoons: Essential for accurate ingredient measurements. A kitchen scale can also work!
- Spatula: Great for mixing and spreading the crust and filling evenly.
Variations
- Berry Medley: Swap out raspberries for a mix of blueberries, strawberries, or blackberries for a colorful twist.
- Nutty Crumble: Add chopped nuts like walnuts or pecans to the topping for an extra crunch and flavor.
- Chocolate Drizzle: Drizzle melted dark chocolate over the cooled bars for a decadent touch that chocolate lovers will adore.
- Spiced Up: Incorporate spices like cinnamon or nutmeg into the crust for a warm, cozy flavor.
- Vegan Option: Use maple syrup instead of honey and substitute coconut oil with vegan butter for a completely plant-based treat.
Serving Suggestions
- Pair these gluten free raspberry crumble bars with a dollop of whipped cream for a delightful dessert.
- Serve alongside a scoop of vanilla ice cream for a delicious contrast of temperatures.
- Enjoy with a cup of herbal tea or coffee for a cozy afternoon treat.
- For a festive touch, dust with powdered sugar before serving.
FAQs about Gluten Free Raspberry Crumble Bars
As you embark on your baking adventure with these gluten free raspberry crumble bars, you might have a few questions. Here are some common queries I’ve encountered, along with helpful answers!
Can I use frozen raspberries instead of fresh?
Yes, you can! Just keep in mind that frozen raspberries may release more moisture. To counter this, add a bit more cornstarch to help thicken the filling.
How do I store leftover bars?
Store your gluten free raspberry crumble bars in an airtight container in the refrigerator. They’ll stay fresh for up to five days, making them a perfect grab-and-go snack!
Can I make these bars ahead of time?
Absolutely! These bars are great for meal prep. You can bake them a day or two in advance and simply cut and serve when you’re ready.
What can I substitute for almond flour?
If you need a nut-free option, sunflower seed flour works wonderfully. You can also use oat flour, but the texture may vary slightly.
Are these bars suitable for kids?
Final Thoughts
Making gluten free raspberry crumble bars is more than just baking; it’s about creating moments of joy. The vibrant raspberries and crumbly topping come together to form a delightful treat that can brighten any day. Whether you’re sharing them with family or enjoying a quiet moment with a cup of tea, these bars are sure to bring smiles. Plus, knowing they’re gluten-free means everyone can indulge without worry. So, roll up your sleeves, gather your ingredients, and let the sweet aroma fill your kitchen. You’ll be glad you did, and your taste buds will thank you!
PrintGluten Free Raspberry Crumble Bars You’ll Love Today!
Delicious gluten-free raspberry crumble bars that are easy to make and perfect for any occasion.
- Prep Time: 15 minutes
- Cook Time: 30 minutes
- Total Time: 45 minutes
- Yield: 16 bars 1x
- Category: Dessert
- Method: Baking
- Cuisine: American
- Diet: Gluten Free
Ingredients
- 2 cups gluten-free oats
- 1 cup almond flour
- 1/2 cup coconut oil, melted
- 1/4 cup honey or maple syrup
- 1 teaspoon vanilla extract
- 1/2 teaspoon salt
- 2 cups fresh raspberries
- 1 tablespoon cornstarch
Instructions
- Preheat the oven to 350°F (175°C) and line an 8×8 inch baking dish with parchment paper.
- In a large bowl, mix together the gluten-free oats, almond flour, melted coconut oil, honey or maple syrup, vanilla extract, and salt until well combined.
- Press half of the mixture into the bottom of the prepared baking dish to form the crust.
- In another bowl, toss the raspberries with cornstarch and spread them evenly over the crust.
- Sprinkle the remaining oat mixture over the raspberries.
- Bake for 25-30 minutes or until the top is golden brown.
- Allow to cool completely before cutting into bars.
Notes
- Store leftovers in an airtight container in the refrigerator for up to 5 days.
- Feel free to substitute other berries if desired.
- For a sweeter bar, increase the amount of honey or maple syrup.
Nutrition
- Serving Size: 1 bar
- Calories: 150
- Sugar: 5g
- Sodium: 50mg
- Fat: 7g
- Saturated Fat: 5g
- Unsaturated Fat: 2g
- Trans Fat: 0g
- Carbohydrates: 20g
- Fiber: 3g
- Protein: 3g
- Cholesterol: 0mg