Introduction to Gluten Free Crepes
Welcome to the delightful world of gluten free crepes! If you’re like me, juggling a busy schedule while trying to whip up something delicious can feel overwhelming. But fear not! These crepes are not only quick to make, but they also offer endless possibilities for both sweet and savory fillings. Imagine impressing your loved ones with a dish that’s as versatile as it is tasty. Whether it’s a cozy breakfast or a fun dinner, gluten free crepes are here to save the day and satisfy those cravings!
Why You’ll Love This Gluten Free Crepes
These gluten free crepes are a game changer for busy moms and professionals alike. They come together in just 30 minutes, making them perfect for a quick breakfast or a last-minute dinner. Plus, their delicate texture and rich flavor will have your family asking for seconds. With endless filling options, you can cater to everyone’s tastes, ensuring that no one leaves the table unsatisfied!
Ingredients for Gluten Free Crepes
Gathering the right ingredients is the first step to creating these delightful gluten free crepes. Here’s what you’ll need:
- Gluten-free all-purpose flour: This is the star of the show! It provides the base for your crepes, ensuring they’re light and fluffy.
- Large eggs: Eggs add richness and help bind the ingredients together, giving your crepes that perfect texture.
- Milk (or dairy-free alternative): Milk adds moisture and helps create a smooth batter. You can use almond, soy, or oat milk for a dairy-free option.
- Melted butter (or coconut oil for dairy-free): This adds flavor and helps prevent sticking. Coconut oil is a great substitute if you’re avoiding dairy.
- Sugar (optional): A touch of sugar can sweeten your crepes, making them perfect for dessert. Feel free to adjust based on your taste!
- Salt: Just a pinch enhances the overall flavor, balancing the sweetness and richness of the crepes.
For exact measurements, check the bottom of the article where you can find everything listed for easy printing. Happy cooking!
How to Make Gluten Free Crepes
Now that you have your ingredients ready, let’s dive into the fun part: making those delicious gluten free crepes! Follow these simple steps, and you’ll be flipping crepes like a pro in no time.
Step 1: Prepare the Batter
Start by whisking together the gluten-free all-purpose flour, eggs, milk, melted butter, sugar, and salt in a mixing bowl. It’s crucial to mix until the batter is smooth and free of lumps. A well-mixed batter ensures your crepes will be light and tender. If you notice any clumps, don’t hesitate to give it another good whisk. Trust me, the effort will pay off!
Step 2: Heat the Skillet
Next, heat a non-stick skillet over medium heat. This is where the magic happens! Once the skillet is hot, lightly grease it with butter or oil. A well-greased skillet prevents sticking and helps achieve that beautiful golden color. If you’re unsure if it’s hot enough, sprinkle a few drops of water on the surface. If they sizzle and evaporate, you’re ready to go!
Step 3: Cook the Crepes
Now comes the exciting part! Pour about 1/4 cup of the batter into the skillet. Quickly tilt the pan in a circular motion to spread the batter evenly across the surface. Cook for 1-2 minutes until the edges start to lift and the bottom is lightly golden. When it’s time to flip, gently slide a spatula under the crepe and give it a quick flip. Cook for another 1-2 minutes on the other side. Don’t worry if your first crepe isn’t perfect; it’s all part of the learning process!
Step 4: Stack and Fill
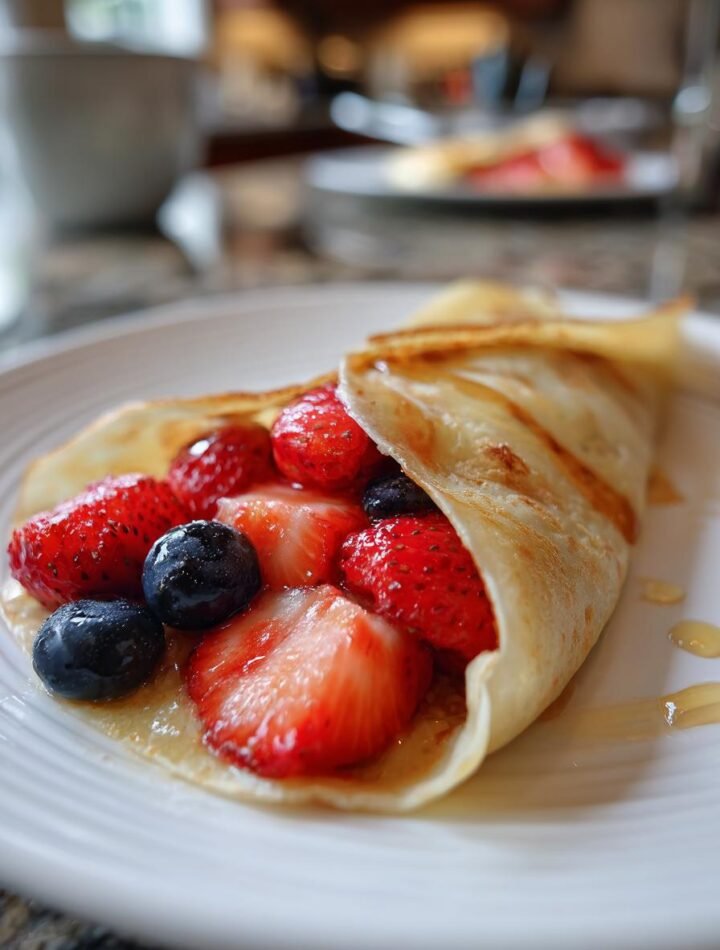
Once cooked, stack the crepes on a plate to keep them warm. Now, let your creativity shine! Fill them with your favorite sweet or savory options. Think fresh fruits, Nutella, or even cheese and veggies for a savory twist. The possibilities are endless! Serve them warm and watch your family’s eyes light up with delight.
Tips for Success
- Make sure your batter is lump-free for the best texture.
- Let the batter rest for 10-15 minutes; this helps the crepes become more tender.
- Use a ladle for pouring the batter to ensure even crepes.
- Keep the heat consistent; too high can burn the crepes.
- Experiment with fillings to find your family’s favorites!
Equipment Needed
- Non-stick skillet: Essential for easy flipping. A cast-iron skillet works too!
- Mixing bowl: Any large bowl will do for whisking the batter.
- Whisk: A standard whisk is perfect, but a fork can work in a pinch.
- Spatula: A flexible spatula helps with flipping the crepes.
- Ladle: Use a ladle for pouring the batter evenly.
Variations of Gluten Free Crepes
- Chocolate Crepes: Add cocoa powder to the batter for a rich, chocolatey twist. Perfect for dessert!
- Herbed Crepes: Mix in fresh herbs like basil or parsley for a savory flavor. Great for filling with cheese and veggies!
- Banana Oat Crepes: Substitute half the flour with oat flour and add mashed bananas for a naturally sweet flavor.
- Spiced Crepes: Incorporate cinnamon or nutmeg into the batter for a warm, cozy taste, especially delightful with apple filling.
- Nut-Free Option: Use sunflower seed milk instead of dairy or nut milk to keep it nut-free while still delicious!
Serving Suggestions for Gluten Free Crepes
- Pair with fresh fruit like strawberries or blueberries for a refreshing touch.
- Serve with a dollop of whipped cream or yogurt for added creaminess.
- Drizzle with maple syrup or honey for a sweet finish.
- Accompany with a light salad for a savory meal.
- Present on a colorful plate to make your crepes visually appealing!
FAQs about Gluten Free Crepes
As I’ve shared my love for gluten free crepes, I know you might have some questions. Here are a few common ones that pop up, along with my answers to help you on your culinary journey!
Can I make gluten free crepes ahead of time?
Absolutely! You can prepare the crepes in advance and store them in the refrigerator. Just stack them with parchment paper in between to prevent sticking. When you’re ready to enjoy, simply reheat them in a skillet or microwave.
What can I use instead of gluten-free flour?
If you don’t have gluten-free all-purpose flour, you can try a blend of almond flour and coconut flour. Just keep in mind that the texture may vary slightly, but it can still be delicious!
How do I store leftover crepes?
Store any leftover crepes in an airtight container in the fridge for up to three days. You can also freeze them for longer storage. Just make sure to separate them with parchment paper before freezing.
Can I make these crepes dairy-free?
Yes! Simply substitute the milk with a dairy-free alternative like almond, soy, or oat milk. You can also use coconut oil instead of butter for a completely dairy-free option.
What are some popular fillings for gluten free crepes?
The options are endless! For sweet crepes, try fresh fruits, Nutella, or whipped cream. For savory, consider cheese, sautéed vegetables, or even chicken. Get creative and find your favorites!
Final Thoughts
Making gluten free crepes is not just about cooking; it’s about creating joyful moments in the kitchen. The aroma of freshly cooked crepes wafting through the house can turn an ordinary day into something special. Whether you’re filling them with sweet delights or savory surprises, these crepes are sure to bring smiles to your family’s faces. Plus, they’re a fantastic way to involve your kids in the kitchen, sparking their creativity. So, roll up your sleeves, gather your loved ones, and enjoy the delicious adventure of gluten free crepes together. Happy cooking!
PrintGluten Free Crepes: Discover Irresistible Recipes Today!

Delicious and versatile gluten-free crepes that can be filled with sweet or savory ingredients.
- Prep Time: 10 minutes
- Cook Time: 20 minutes
- Total Time: 30 minutes
- Yield: 8-10 crepes 1x
- Category: Breakfast
- Method: Stovetop
- Cuisine: French
- Diet: Gluten Free
Ingredients
- 1 cup gluten-free all-purpose flour
- 2 large eggs
- 1 1/2 cups milk (or dairy-free alternative)
- 2 tablespoons melted butter (or coconut oil for dairy-free)
- 1 tablespoon sugar (optional)
- 1/2 teaspoon salt
Instructions
- In a mixing bowl, whisk together the gluten-free flour, eggs, milk, melted butter, sugar, and salt until smooth.
- Heat a non-stick skillet over medium heat and lightly grease it with butter or oil.
- Pour about 1/4 cup of the batter into the skillet, tilting the pan to spread it evenly.
- Cook for 1-2 minutes until the edges start to lift and the bottom is lightly golden.
- Flip the crepe and cook for another 1-2 minutes on the other side.
- Repeat with the remaining batter, stacking the crepes on a plate.
- Fill with your favorite sweet or savory fillings and serve warm.
Notes
- For a sweeter crepe, add more sugar to the batter.
- These crepes can be made ahead of time and stored in the refrigerator.
- Experiment with different fillings like fruits, Nutella, or cheese.
Nutrition
- Serving Size: 1 crepe
- Calories: 120
- Sugar: 1g
- Sodium: 150mg
- Fat: 5g
- Saturated Fat: 2g
- Unsaturated Fat: 3g
- Trans Fat: 0g
- Carbohydrates: 15g
- Fiber: 1g
- Protein: 4g
- Cholesterol: 70mg