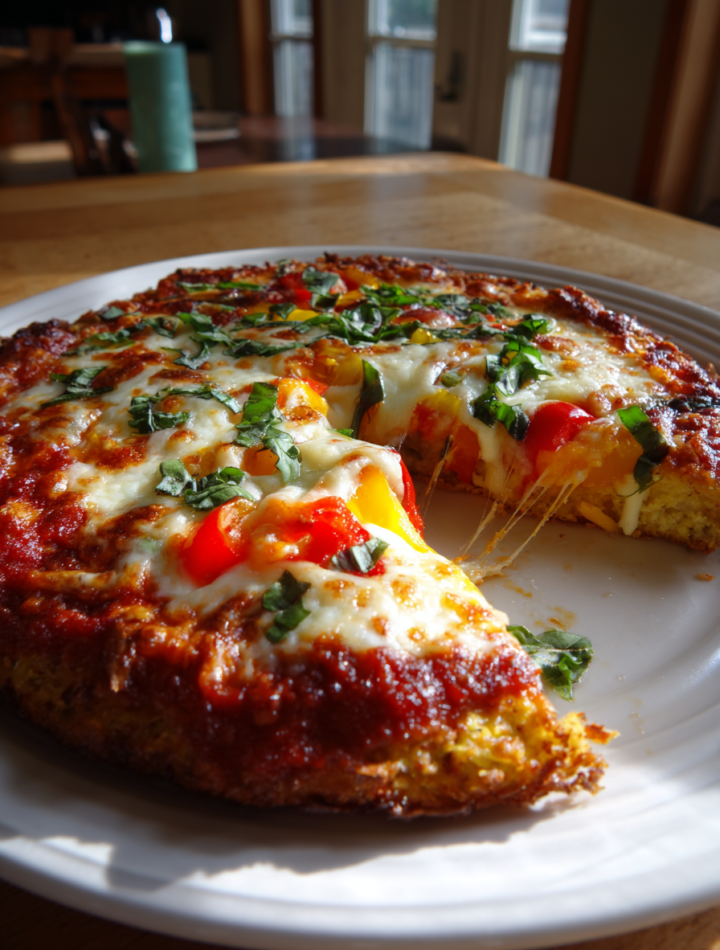
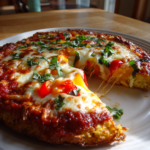
Introduction to Gluten‑free Pizza Crust
As a busy mom, I know how chaotic weeknights can get. Between juggling work, kids, and everything in between, finding time to cook can feel like a daunting task. That’s why I’m excited to share this gluten-free pizza crust recipe with you! It’s not just easy to make; it’s a delightful way to transform your pizza nights into something special. Imagine gathering around the table, enjoying a homemade pizza that everyone loves, all while knowing it’s gluten-free. Trust me, this recipe will quickly become a go-to for your family!
Why You’ll Love This Gluten‑free Pizza Crust
This gluten-free pizza crust is a game changer for busy nights! It’s quick to whip up, taking just 40 minutes from start to finish. Plus, the taste is simply divine—crispy on the outside and soft on the inside. You can customize it with your favorite toppings, making it a hit for everyone at the table. Say goodbye to store-bought options and hello to a homemade delight that brings joy to your family!
Ingredients for Gluten‑free Pizza Crust
Gathering the right ingredients is the first step to creating a delicious gluten-free pizza crust. Here’s what you’ll need:
- Gluten-free all-purpose flour: This is the star of the show! It provides the base for your crust. Make sure to choose a certified gluten-free blend to avoid any cross-contamination.
- Baking powder: This helps the crust rise, giving it that lovely fluffy texture. It’s a must for achieving the perfect bite!
- Salt: A pinch of salt enhances the flavor of the crust. It’s like a secret ingredient that brings everything together.
- Olive oil: This adds richness and moisture to the dough. Plus, it gives the crust a beautiful golden color when baked.
- Warm water: This activates the yeast, helping the dough rise. Make sure it’s warm, not hot, to keep the yeast happy!
- Sugar: Just a teaspoon helps to feed the yeast, ensuring a nice rise. It’s a small but mighty ingredient!
- Active dry yeast: This is what makes your crust rise and gives it that delightful texture. Always check the expiration date for the best results.
Feel free to get creative! You can add herbs like oregano or basil to the dough for extra flavor. If you’re looking for a dairy-free option, substitute olive oil with avocado oil. For exact measurements, check the bottom of the article where you can find everything available for printing.
How to Make Gluten‑free Pizza Crust
Now that you have your ingredients ready, let’s dive into the fun part—making your gluten-free pizza crust! Follow these simple steps, and you’ll have a delicious crust that’s sure to impress.
Step 1: Prepare the Yeast Mixture
Start by combining warm water, sugar, and active dry yeast in a small bowl. Stir gently and let it sit for about 5 minutes. You’ll know it’s ready when it becomes frothy and bubbly. This step is crucial as it activates the yeast, giving your crust that lovely rise!
Step 2: Mix Dry Ingredients
In a large mixing bowl, whisk together the gluten-free all-purpose flour, baking powder, and salt. This blend is the foundation of your crust. Make sure there are no lumps, as a smooth mixture will lead to a better texture. It’s like creating a canvas for your pizza masterpiece!
Step 3: Combine Ingredients
Now, it’s time to bring everything together. Pour the yeast mixture and olive oil into the bowl with the dry ingredients. Mix until a dough forms. You can use a spatula or your hands—whichever you prefer! The dough should be slightly sticky but manageable. If it’s too dry, add a splash of warm water.
Step 4: Let the Dough Rise
Cover the dough with a clean cloth and place it in a warm spot. Let it rise for about 30 minutes. This step is essential for developing flavor and texture. You’ll notice the dough puffing up, which is a sign that the yeast is doing its job!
Step 5: Preheat the Oven
While the dough is rising, preheat your oven to 425°F (220°C). This temperature is perfect for achieving that golden-brown crust. Don’t skip this step; a hot oven is key to a crispy base!
Step 6: Roll Out the Dough
Once the dough has risen, it’s time to roll it out. Dust a clean surface with gluten-free flour to prevent sticking. Roll the dough to your desired thickness—thinner for a crispy crust or thicker for a chewier bite. Just remember, it will puff up a bit while baking!
Step 7: Transfer and Top
Carefully transfer the rolled dough to a pizza stone or baking sheet. This is where the magic happens! Add your favorite toppings, whether it’s classic marinara and cheese or a veggie-packed delight. Get creative and make it your own!
Step 8: Bake the Pizza
Finally, pop your pizza into the preheated oven. Bake for 15-20 minutes or until the crust is golden brown. Keep an eye on it, as ovens can vary. The aroma will fill your kitchen, making it hard to wait!
Tips for Success
- Always measure your gluten-free flour accurately for the best results.
- Let the dough rise in a warm, draft-free area for optimal puffiness.
- Experiment with different gluten-free flour blends for unique flavors.
- Don’t rush the baking process; a golden crust is worth the wait!
- Use parchment paper for easy transfer and cleanup.
Equipment Needed
- Mixing bowl: A large bowl for combining ingredients. A sturdy pot can work in a pinch.
- Whisk: For mixing dry ingredients. A fork can also do the trick!
- Rolling pin: To roll out the dough. A wine bottle can serve as a fun alternative.
- Baking sheet or pizza stone: For baking your pizza. A cast-iron skillet is a great substitute!
Variations
- Herb-Infused Crust: Add dried oregano, basil, or garlic powder to the dough for an aromatic twist.
- Cheesy Crust: Mix in grated Parmesan or nutritional yeast for a cheesy flavor without gluten.
- Spicy Kick: Incorporate red pepper flakes into the dough for a zesty touch that will excite your taste buds.
- Cauliflower Crust: For a low-carb option, substitute half of the gluten-free flour with finely riced cauliflower.
- Sweet Pizza Crust: Add a tablespoon of honey or maple syrup to the dough for a sweet base, perfect for dessert pizzas.
Serving Suggestions
- Fresh Salad: Pair your pizza with a crisp garden salad for a refreshing contrast.
- Garlic Bread: Serve with gluten-free garlic bread for a delightful side.
- Wine Pairing: Enjoy a glass of red wine to complement the flavors of your pizza.
- Presentation: Slice your pizza into fun shapes for a kid-friendly touch!
FAQs about Gluten‑free Pizza Crust
Can I use regular flour instead of gluten-free flour?
No, this recipe specifically calls for gluten-free all-purpose flour. Regular flour contains gluten, which is what we’re avoiding. Using gluten-free flour ensures that everyone can enjoy the pizza without any issues!
How do I store leftover gluten-free pizza crust?
Store any leftover dough in an airtight container in the refrigerator for up to 3 days. You can also freeze it for longer storage. Just make sure to wrap it tightly to prevent freezer burn!
Can I make this pizza crust ahead of time?
Absolutely! You can prepare the dough in advance and let it rise. Just cover it and refrigerate until you’re ready to roll it out and bake. It’s a great way to save time on busy nights!
What toppings work best with gluten-free pizza crust?
The beauty of this crust is its versatility! You can use any toppings you love—classic marinara and mozzarella, fresh veggies, or even barbecue chicken. Just make sure your toppings are gluten-free!
Is this pizza crust suitable for kids?
Definitely! Kids love pizza, and this gluten-free pizza crust is a fun way to include them in the kitchen. Let them choose their favorite toppings for a personalized pizza night!
Final Thoughts
Making this gluten-free pizza crust has been a delightful journey for me, and I hope it becomes a cherished recipe in your home too. There’s something magical about gathering around the table, sharing laughter, and enjoying a meal that everyone can savor. This crust not only satisfies cravings but also brings a sense of accomplishment. Whether it’s a cozy family night or a fun gathering with friends, this recipe is sure to impress. So roll up your sleeves, get creative with toppings, and enjoy the joy of homemade pizza nights that everyone can enjoy!
PrintGluten-free pizza crust: Transform your pizza nights!
A delicious and easy-to-make gluten-free pizza crust that will transform your pizza nights into a delightful experience.
- Prep Time: 10 minutes
- Cook Time: 20 minutes
- Total Time: 40 minutes
- Yield: 1 pizza crust 1x
- Category: Main Dish
- Method: Baking
- Cuisine: Italian
- Diet: Gluten Free
Ingredients
- 2 cups gluten-free all-purpose flour
- 1 teaspoon baking powder
- 1 teaspoon salt
- 1 tablespoon olive oil
- 3/4 cup warm water
- 1 teaspoon sugar
- 1 packet (2 1/4 teaspoons) active dry yeast
Instructions
- In a small bowl, combine warm water, sugar, and yeast. Let it sit for about 5 minutes until frothy.
- In a large mixing bowl, whisk together gluten-free flour, baking powder, and salt.
- Add the yeast mixture and olive oil to the dry ingredients. Mix until a dough forms.
- Cover the dough with a clean cloth and let it rise in a warm place for about 30 minutes.
- Preheat your oven to 425°F (220°C).
- Roll out the dough on a floured surface to your desired thickness.
- Transfer the rolled dough to a pizza stone or baking sheet.
- Add your favorite toppings and bake for 15-20 minutes or until the crust is golden brown.
Notes
- Make sure to use certified gluten-free flour to avoid cross-contamination.
- You can add herbs or spices to the dough for extra flavor.
- Store any leftover dough in the refrigerator for up to 3 days.
Nutrition
- Serving Size: 1 slice
- Calories: 150
- Sugar: 1g
- Sodium: 200mg
- Fat: 5g
- Saturated Fat: 1g
- Unsaturated Fat: 4g
- Trans Fat: 0g
- Carbohydrates: 22g
- Fiber: 2g
- Protein: 3g
- Cholesterol: 0mg