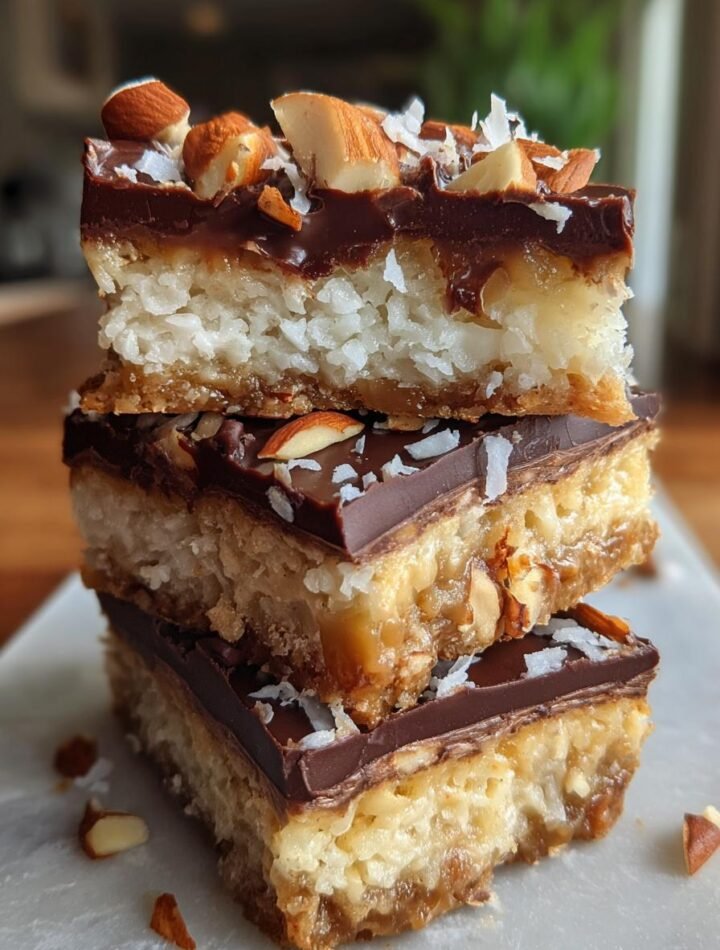
Introduction to Gluten Free Almond Joy Bars
As a busy mom, I know how challenging it can be to find time for a sweet treat that’s both delicious and healthy. That’s where these gluten free almond joy bars come in! They’re the perfect solution for satisfying those chocolate cravings without the guilt. Imagine biting into a rich, chocolatey bar filled with coconut and crunchy almonds. It’s like a mini vacation for your taste buds! Plus, they’re quick to whip up, making them an ideal dessert for any occasion. Trust me, your family will love them just as much as you do!
Why You’ll Love This Gluten Free Almond Joy Bars
These gluten free almond joy bars are a game-changer for busy days! They come together in just 15 minutes, making them a quick and easy treat. The combination of rich chocolate, sweet coconut, and crunchy almonds creates a flavor explosion that’s hard to resist. Plus, they’re no-bake, so you won’t heat up the kitchen. Perfect for satisfying cravings or impressing guests, these bars are a delightful addition to any dessert table!
Ingredients for Gluten Free Almond Joy Bars
Gathering the right ingredients is key to making these delightful gluten free almond joy bars. Here’s what you’ll need:
- Almond flour: This gluten-free flour gives the bars a nutty flavor and a chewy texture.
- Shredded unsweetened coconut: Adds sweetness and a tropical flair, making every bite feel like a mini getaway.
- Honey or maple syrup: Both serve as natural sweeteners, with honey offering a floral note and maple syrup a rich, earthy flavor.
- Almond butter: This creamy ingredient binds everything together while enhancing the almond flavor.
- Vanilla extract: A splash of this adds warmth and depth to the overall taste.
- Salt: Just a pinch helps balance the sweetness and enhances the flavors.
- Dark chocolate chips (gluten-free): The star of the show! They provide a luscious, rich coating that makes these bars irresistible.
- Whole almonds: These are the perfect crunchy topping, adding texture and a satisfying bite.
Feel free to get creative! If you’re looking for a nut-free version, you can substitute almond flour with sunflower seed flour. For those who prefer a sweeter treat, adjust the amount of honey or maple syrup to your liking. You can find all the exact measurements at the bottom of the article, ready for printing!
How to Make Gluten Free Almond Joy Bars
Now that you have all your ingredients ready, let’s dive into making these delightful gluten free almond joy bars. Follow these simple steps, and you’ll have a delicious treat in no time!
Step 1: Mix the Base Ingredients
In a mixing bowl, combine the almond flour, shredded coconut, honey (or maple syrup), almond butter, vanilla extract, and salt. Use a spatula or spoon to mix everything until it’s well combined. The mixture should be sticky and hold together nicely. This is the foundation of your bars, so make sure it’s mixed thoroughly!
Step 2: Press into Baking Dish
Next, take your mixture and press it evenly into a lined baking dish. I like to use parchment paper for easy removal later. Use your hands or the back of a measuring cup to pack it down firmly. This step is crucial for ensuring your bars hold their shape once set.
Step 3: Chill to Set
Pop the baking dish into the refrigerator and chill for about 30 minutes. This helps the mixture firm up, making it easier to pour the chocolate on top later. While you wait, you can daydream about how delicious these no-bake bars will be!
Step 4: Melt the Chocolate
Now, it’s time for the chocolate! Melt the dark chocolate chips in a microwave-safe bowl or a double boiler. If using the microwave, heat in 30-second intervals, stirring in between until smooth. The chocolate should be glossy and pourable, ready to coat your bars.
Step 5: Pour and Spread Chocolate
Once your chocolate is melted, pour it over the chilled mixture in the baking dish. Use a spatula to spread it evenly across the top. This chocolate layer is what makes these bars so indulgent, so don’t be shy!
Step 6: Add Whole Almonds
Now, take your whole almonds and sprinkle them on top of the melted chocolate. Gently press them into the chocolate so they stick. This adds a lovely crunch and makes your bars look extra appealing!
Step 7: Final Chill
Return the baking dish to the refrigerator and chill again until the chocolate is set, which should take about 1 hour. This is the perfect time to clean up your kitchen or enjoy a cup of tea while you wait.
Step 8: Cut and Serve
Once the chocolate is firm, remove the bars from the baking dish using the parchment paper. Cut them into squares or rectangles, whatever suits your fancy! Serve them up and watch as your family devours these tasty chocolate coconut bars.
Tips for Success
- Make sure to pack the base mixture tightly in the baking dish for sturdy bars.
- Use high-quality dark chocolate for the best flavor and texture.
- Let the bars chill completely to ensure they hold their shape when cut.
- Experiment with different toppings like chopped nuts or dried fruit for variety.
- Store leftovers in an airtight container to keep them fresh and delicious.
Equipment Needed
- Mixing bowl: A large bowl for combining ingredients. A sturdy pot can work in a pinch.
- Spatula: For mixing and spreading. A wooden spoon is a great alternative.
- Baking dish: An 8×8 inch dish is ideal. Any similar-sized container will do.
- Parchment paper: For easy removal. You can also use plastic wrap.
- Microwave or double boiler: For melting chocolate. A small saucepan can work too.
Variations
- Nut-free version: Substitute almond flour with sunflower seed flour for a delicious nut-free alternative.
- Sweetness adjustment: Use more or less honey or maple syrup to customize the sweetness to your taste.
- Flavor boost: Add a pinch of cinnamon or a dash of espresso powder to enhance the chocolate flavor.
- Fruit addition: Mix in some dried fruit like cranberries or raisins for a chewy texture and added sweetness.
- Protein-packed: Stir in a scoop of your favorite protein powder for an extra nutritional boost.
Serving Suggestions
- Pair these gluten free almond joy bars with a cup of herbal tea for a cozy afternoon treat.
- Serve them alongside fresh fruit for a balanced snack that satisfies sweet cravings.
- For a festive touch, drizzle melted chocolate on top before serving.
- Present them on a colorful platter to impress guests at gatherings.
FAQs about Gluten Free Almond Joy Bars
As you embark on your journey to make these delightful gluten free almond joy bars, you might have a few questions. Here are some common queries I’ve encountered, along with helpful answers!
Can I use a different type of nut butter?
Absolutely! While almond butter is delicious, you can swap it for peanut butter or cashew butter. Just keep in mind that it will change the flavor slightly, but it will still be tasty!
How long do these bars last?
These bars can be stored in an airtight container in the refrigerator for up to a week. They make for a great grab-and-go snack!
Can I freeze the bars?
Yes, you can freeze them! Just wrap each bar individually in plastic wrap and place them in a freezer-safe container. They’ll stay fresh for up to three months.
What can I use instead of honey or maple syrup?
If you’re looking for a sugar-free option, you can use a sugar substitute like stevia or erythritol. Just adjust the amount to your taste, as these sweeteners can vary in sweetness.
Are these bars suitable for kids?
Definitely! These healthy dessert bars are a great treat for kids. They’re packed with wholesome ingredients and are a fun way to satisfy their sweet tooth without the guilt!
Final Thoughts
Making these gluten free almond joy bars has been a delightful experience that brings joy to my kitchen and my family. Each bite is a reminder that healthy treats can be indulgent and satisfying. Whether you’re enjoying them as a quick snack or sharing them with friends, these bars are sure to impress. I love how easy they are to whip up, making them a go-to recipe for busy days. So, gather your ingredients and treat yourself to a little slice of happiness. You deserve it!
PrintGluten free almond joy bars that satisfy your cravings!
Delicious gluten-free almond joy bars that combine the rich flavors of chocolate, coconut, and almonds for a satisfying treat.
- Prep Time: 15 minutes
- Cook Time: 0 minutes
- Total Time: 1 hour 15 minutes
- Yield: 12 bars 1x
- Category: Dessert
- Method: No-bake
- Cuisine: American
- Diet: Gluten Free
Ingredients
- 1 cup almond flour
- 1/2 cup shredded unsweetened coconut
- 1/4 cup honey or maple syrup
- 1/4 cup almond butter
- 1/2 teaspoon vanilla extract
- 1/4 teaspoon salt
- 1 cup dark chocolate chips (gluten-free)
- 1/4 cup whole almonds
Instructions
- In a mixing bowl, combine almond flour, shredded coconut, honey (or maple syrup), almond butter, vanilla extract, and salt until well mixed.
- Press the mixture into a lined baking dish evenly.
- Chill in the refrigerator for about 30 minutes to set.
- Melt the dark chocolate chips in a microwave or double boiler.
- Pour the melted chocolate over the chilled mixture and spread evenly.
- Top with whole almonds, pressing them gently into the chocolate.
- Refrigerate again until the chocolate is set, about 1 hour.
- Cut into bars and serve.
Notes
- Store in an airtight container in the refrigerator for up to a week.
- Feel free to adjust the sweetness by adding more or less honey/maple syrup.
- For a nut-free version, substitute almond flour with sunflower seed flour.
Nutrition
- Serving Size: 1 bar
- Calories: 180
- Sugar: 8g
- Sodium: 50mg
- Fat: 12g
- Saturated Fat: 4g
- Unsaturated Fat: 8g
- Trans Fat: 0g
- Carbohydrates: 15g
- Fiber: 3g
- Protein: 4g
- Cholesterol: 0mg